7-layer taco dip

Recipe

Recipe Notes

We are getting ready for a winter storm, or as the Washington Post calls it — a ‘bomb cyclone.’ Huh?? Anyway, what’s your go-to blizzard food? This appetizer could be fun if you’re home with your family or if you’re headed to a blizzard party. Hint: it’s also a crowd-pleaser at other types of parties :).

Seven layers = seven ingredients plus chips! You can substitute other types of chili – for example, I made this with a can of Amy’s chili to make it vegetarian. The Amy’s chili was a little runny but still worked well, especially with the scoop-shaped tortilla chips. Feel free to adjust the amounts of ingredients to your liking. Love onion? Use a whole one! Hate olives? Skip ’em. You really can’t go wrong!

Photos

20180101123101_IMG_1897.jpg
Taco dip, pre-cheese and pre-oven
20180101123233_IMG_1900.jpg
Check out my layers!

Beef and pineapple curry

This was something a little different for me…but I was inspired by the green beans I blanched and froze from last summer’s CSA. Speaking of CSA, I haven’t signed up for one yet and I’m not quite sure what I’m going to do!

2017-03-05 20.02.38
Curry in a hurry

Beef and pineapple curry
Serves: 4
Source: adapted from Everyday Food, October 2011

Ingredients
1 Tablespoon canola oil
1 clove garlic, minced
1 Tablespoon grated fresh ginger
1/4 cup red curry paste
1 pound sirloin steak, trimmed and cut against the grain into thin strips
1/2 pound green beans, trimmed and cut in half crosswise
1 red bell pepper, cut into strips
2 cups (12 ounces) diced fresh pineapple
1 1/2 cups low-sodium chicken broth
1 cup coconut milk
Cooked rice, for serving
1/2 cup fresh basil leaves, torn

Directions
1. In a large skillet or wok, heat oil over medium-high heat. Add garlic and cook for 2 minutes. Stir in curry paste and ginger and cook for about 30 seconds, until fragrant. Add steak and cook, stirring, for 2 minutes until browned.

2. Add green beans, bell pepper, and pineapple and cook, stirring, for 1 minute or until pineapple starts to release juices.

3. Add broth and coconut milk and bring to a boil. Reduce heat and simmer until green beans are crisp-tender, 8 minutes.

4. Serve over rice, topped with basil.

Dijon-rosemary chicken thighs with butternut squash

I got a new cookbook for Christmas (thanks Battenfelds!) and it’s all about the sheet pan. Cooking your protein and veg together on the same pan is definitely a win for me! 

Even when I make a list for the grocery store, I seem to always manage to forget something. This time it was the maple syrup, so I improvised and subbed in brown sugar. The original version also uses sugar pumpkin but suggests butternut squash or sweet potatoes as an alternative. I think sweet potatoes would cook faster than the chicken (the butternut squash kind of did), though it depends on how you cut it. If you’re using sweet potatoes or small pieces of squash, you could add them to the pan after the first 10-15 minutes of cooking the chicken.

Dijon-rosemary chicken thighs with butternut squash
Serves: 3-4

Prepping the squash

Source: adapted from Sheet Pan cookbook

Ingredients
2 Tablespoons Dijon mustard
3 Tablespoons olive oil, divided
1 Tablespoon balsamic vinegar
2 large loves garlic, chopped
2 Tablespoons chopped fresh rosemary
4 skin-on bone-in chicken thighs (about 2 pounds)
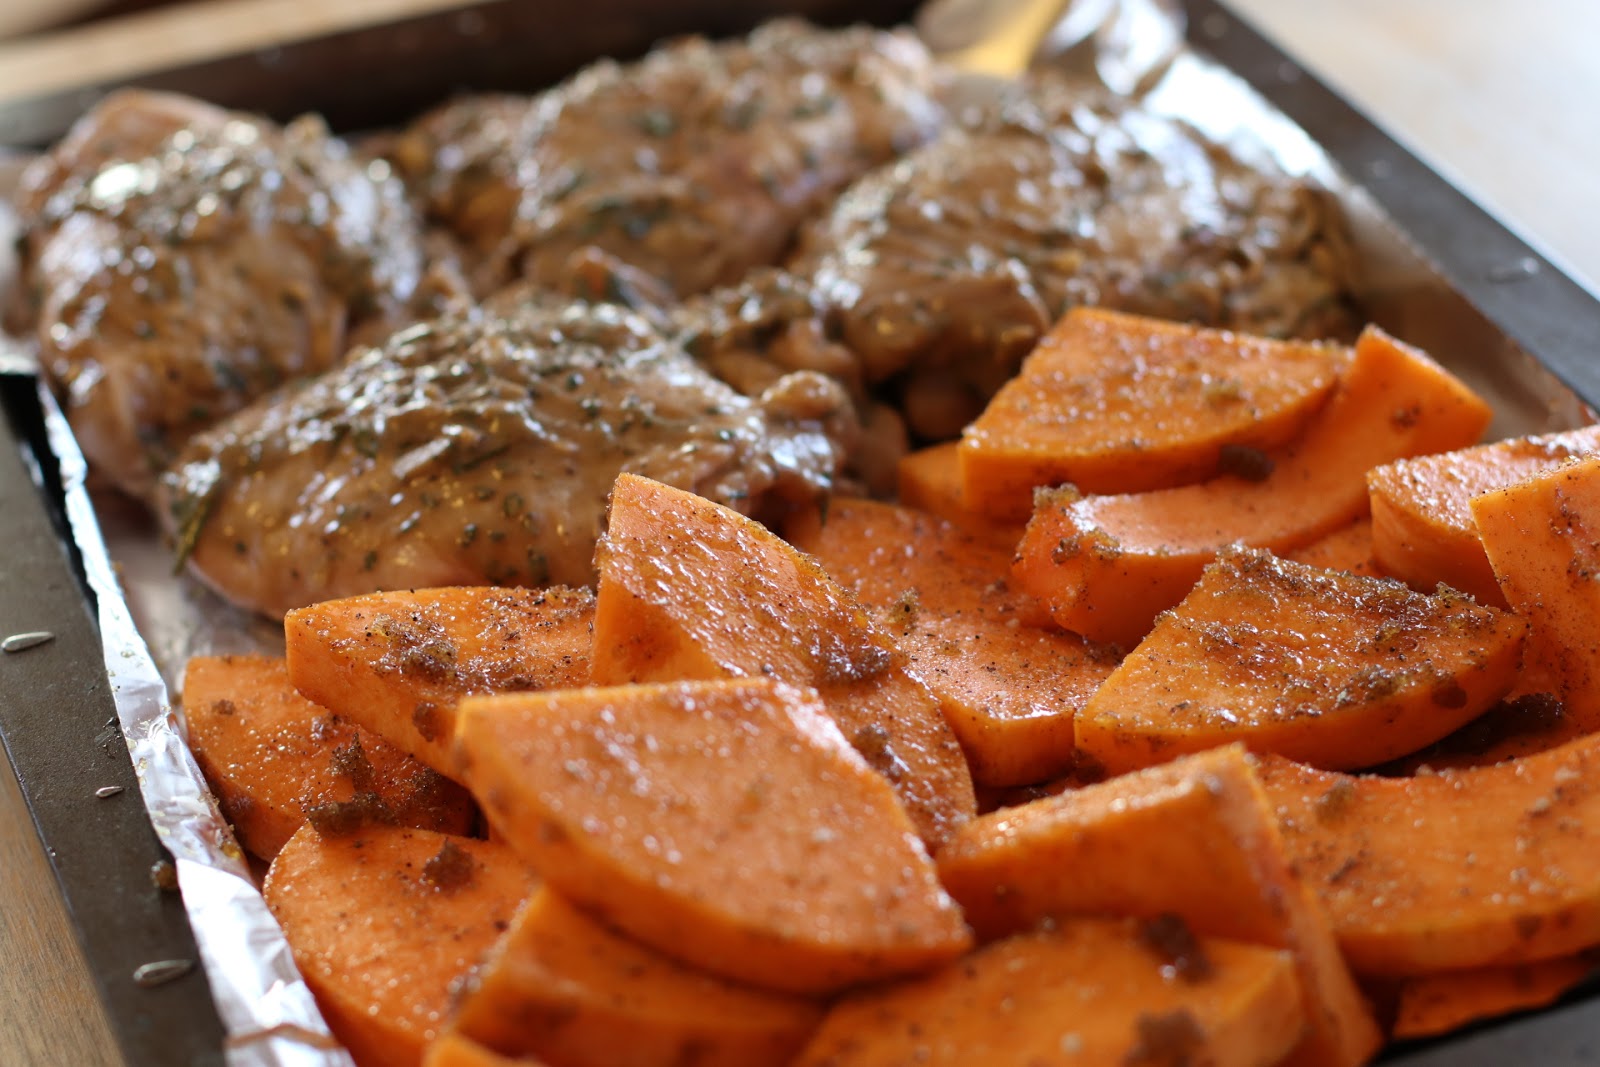
1/2 butternut squash, cut into wedges or large chunks
2 Tablespoons brown sugar
1/4 teaspoon chili powder

Ready for the oven

Salt and pepper to taste

Directions
1. Preheat oven to 400 degrees F. Line a sheet pan with aluminum foil (I use nonstick foil).

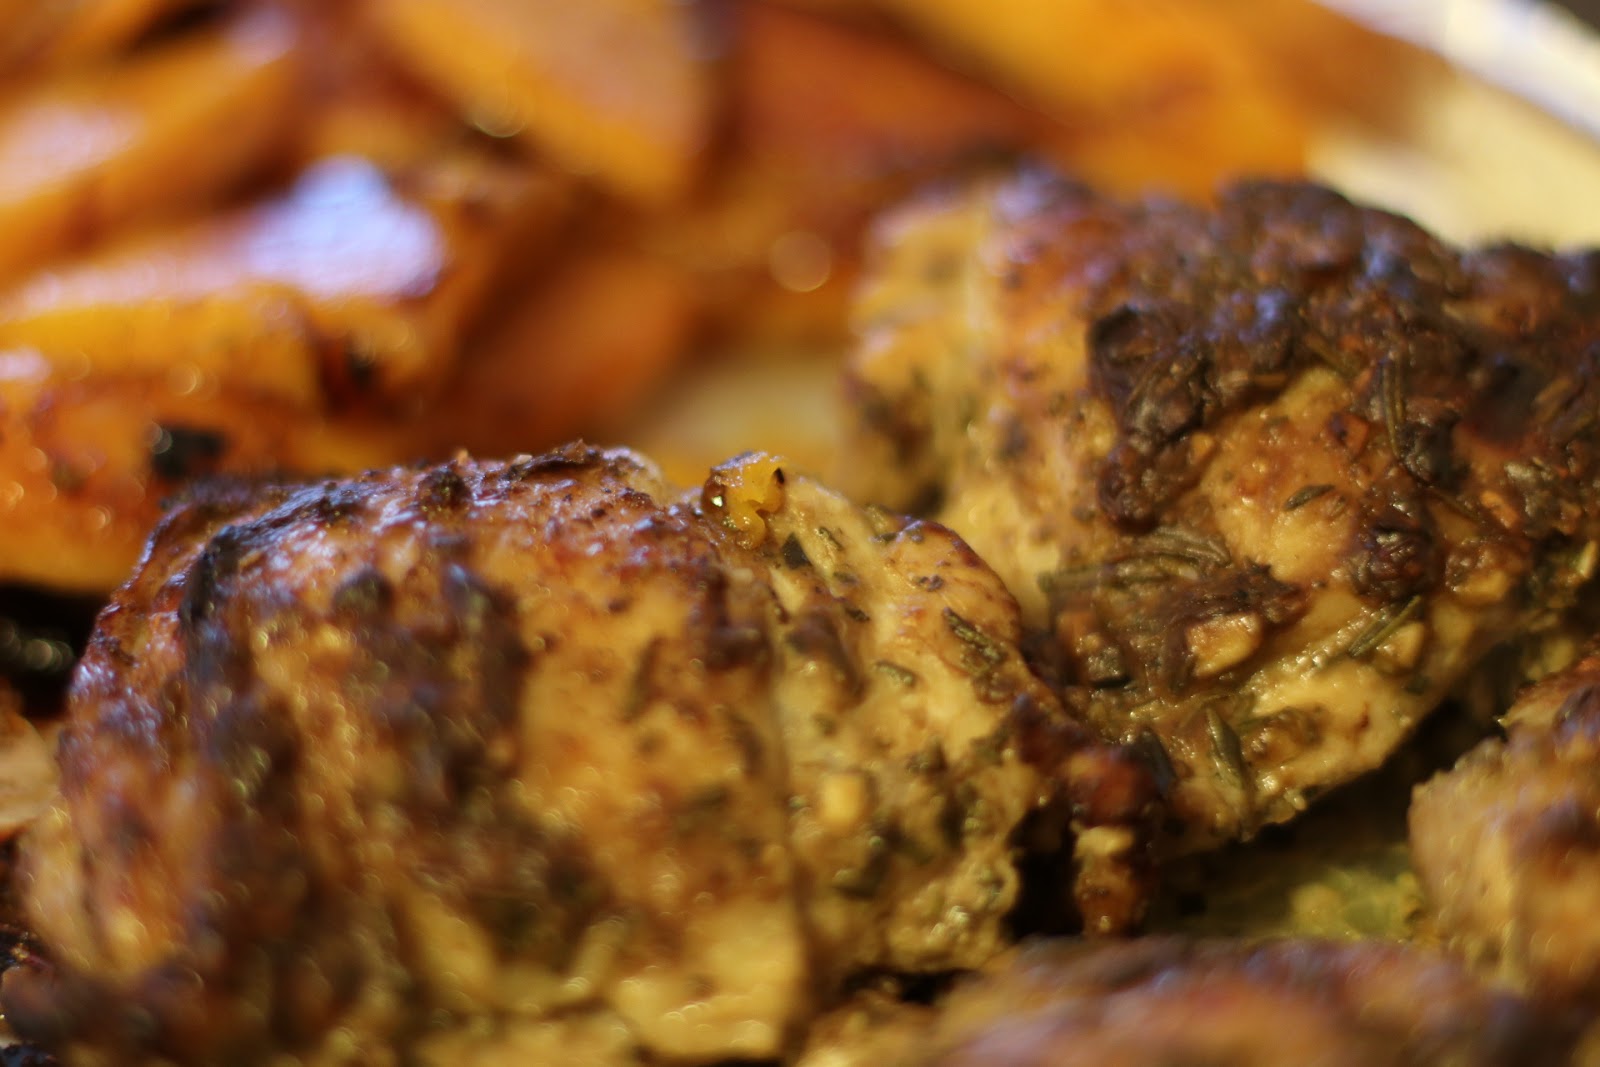
2. In a large bowl, whisk together the mustard, 2 Tablespoons of olive oil, balsamic vinegar, garlic, and rosemary. Add the chicken and toss to coat. Set aside.

Roasted chicken and squash goodness!


3. In another large bowl, mix together the butternut squash, brown sugar, chili powder, and 1 Tablespoon of olive oil. 

4. Arrange the squash on one half of the prepared pan. Place the chicken, skin side up, on the other half of the pan. Season both the squash and the chicken with salt and pepper.

5. Roast the chicken and squash for about 45 minutes, giving the squash a stir about halfway through, until the chicken is opaque throughout and the squash is soft. Enjoy!

Roasted cauliflower and kale salad

I made this on a weeknight and the cauliflower took longer than I expected. It would be great to roast it ahead of time and then this definitely becomes an easy and healthy weeknight meal. I roasted the whole head of cauliflower, but only put half in the salad. If you roast the whole head, use 2 Tbsp olive oil.

When mixing the kale, I like to massage it with my hands. This will help soften it. I chose lacinato (also called Tuscan) kale because you don’t necessarily have to de-stem it.

Roasted cauliflower and kale salad

Hearty salad

Inspired by Good Housekeeping
Serves: 2-3 main dish, 4 sides

Ingredients
1/2 head cauliflower, cut into florets
3 Tablespoons olive oil, divided
Salt and ground black pepper
1 bunch lacinato kale, washed and chopped
Juice from 1 lemon
1/4 red onion, thinly sliced
1/2 cup toasted pecans
1/2 cup chick peas
2 ounces goat cheese, crumbled

Directions
1. Preheat oven to 450 degrees F. Toss cauliflower florets with 1 Tablespoon olive oil, 1/4 teaspoon salt, and 1/4 teaspoon ground black pepper. Place in a single layer on a baking sheet and roast for 30-40 minutes or until soft, tossing occasionally.

2. In a large bowl, mix together kale, 2 Tablespoons olive oil, lemon juice, and 1/4 teaspoon salt. Let sit while cauliflower cooks or at least 5 minutes.

3. Remove cauliflower from oven and let cool slightly, then add to kale. Mix in onion, pecans, chick peas, and goat cheese. Serve and enjoy!

Mini frittatas

This is so my kind of recipe — prep once, use what you have, and there’s breakfast for days. With a basic base of eggs and milk (I am obsessed with almond/coconut milk these days), you can get creative with whatever else you want to throw in. The original recipe had spinach, goat cheese, roasted red pepper, and prosciutto. I went with spinach, red onion, shredded mozzarella, and crumbled bacon…the frozen, real bacon kind, not the bacon bits kind.

I am still always amazed by how much fresh spinach cooks down. You want to just wilt the spinach and then remove it from the heat. If you have time, let it cool a bit before mixing it in with the eggs. You don’t want the hot spinach to start to cook the eggs!

I used a 1/4-cup measuring cup to fill the muffin cups, which was just about the perfect amount. Unfortunately my muffin tin is pretty shallow so the cups were pretty pretty full when I put them in the oven, and then they puffed up and overflowed a bit while cooking. If you think your’re at risk of overflow, put the muffin tin on a baking sheet in the oven to avoid having to clean your oven afterwards! #themoreyouknow

Wilting spinach


Mini frittatas
Inspired by Good Housekeeping, January 2017
Makes: 12 mini frittatas

Ingredients

Filled muffin cups, pre overflow

1 Tablespoon olive oil
1/2 medium onion, diced
5 ounces baby spinach
6 large eggs
1/2 cup milk
1/2 cup shredded cheese
3 Tablespoons crumbled bacon (optional)
Salt and pepper

Directions

Breakfast, with a side of avocado toast

1. In a large saute pan, heat olive oil over medium heat. Add onion and cook 3-4 minutes until softened. Stir in spinach and cook until just wilted. Remove from heat.

2. Preheat oven to 350 degrees F. Spray a 12-cup muffin pan with nonstick cooking spray.

3. In a large bowl, beat eggs and milk. Stir in cheese and spinach mixture and season with salt and pepper.

4. Divide egg mixture evenly into muffin pan cups (about 1/4 cup each) and top each with crumbled bacon. Bake 20-25 minutes or until center is just set.

5. Cool in pan on rack for 5 minutes before removing from cups. Serve warm. To reheat leftovers, microwave on high for about 30 seconds. Enjoy!


Related posts
Chard and ricotta pie
Marathon strata
Spinach bacon cheddar strata

Mashed sweet potatoes

Have you ever tried to make mashed sweet potatoes the same way you would make “regular” mashed potatoes? How did they turn out? Probably not so great, if I had to guess. I don’t like to boil sweet potatoes because they absorb too much of the water. The trick is to cook them in a small amount of liquid — I use a combination of light cream and broth, sometimes adding a bit more broth as some of the liquid cooks off or gets absorbed by the potatoes. I also like to top them with some toasted pecans for some extra flavor and crunch!

Mashed sweet potatoes

Mashed sweet potatoes with pecans

Serves: 4-6

Ingredients
4 Tablespoons unsalted butter, cut into pieces
1/4-1/2 cup chicken or vegetable broth
3 Tablespoons light cream, divided
1/4 teaspoon salt
1/4 teaspoon pepper
2 pounds sweet potatoes (about 3 medium)
1/4 cup chopped toasted pecans (optional)

Directions
1. Peel sweet potatoes, then quarter them lengthwise and cut into chunks about 1/4″ thick.

2. Combine butter, 2 Tablespoons cream, 1/4 cup broth, salt, pepper, and sweet potatoes in a large saucepan. Cook, covered, over low heat until potatoes are soft and falling apart, 35-40 minutes. Check occasionally and add more broth if the liquid has cooked off.

3. Remove from heat, add remaining Tablespoon of cream and mash with a potato masher. Top with chopped pecans and enjoy!

Chard and ricotta pie

I love trying new recipes, but I also rely on some staples in the KCaE archives. So I’ve decided to occasionally repost some of the “classics” like this Chard and ricotta pie. I can’t believe I’ve been making this for more than four years! 

This is one that really comes in handy when I have a plethora of greens and eggs. It really works for any meal. Feel free to substitute other vegetables for the chard, and if you don’t have green onions then a regular ol’ white or yellow onion works just fine. You can make this in a pie plate or a muffin tin. The muffin tin works great for breakfast or snacks on the go.


Flashback: March 13, 2012

Pie for dinner!


Chard and ricotta pie
Source: Good Housekeeping
Serves: 4 main-dish servings (or about 18 individual “pies”)

Ingredients
1 large head Swiss chard
1 Tbsp olive oil
1 bunch green onions, sliced thinly
Salt and pepper
Red pepper flakes
4 large eggs
1 container (15 ounces) part skim ricotta cheese
3/4 cup low-fat milk
1/2 cup freshly grated Parmesan cheese
2 Tbsp cornstarch

Directions
1. Preheat oven to 350 degrees F. Grease 9 1/2-inch deep-dish glass pie plate (or muffin tins).

2. Cut off and discard bottom 2 inches of Swiss chard stems. Separate stems from leaves; thinly slice stems and coarsely chop leaves.

3. In 12-inch skillet, heat oil on medium-high until hot. Add sliced stems and cook 4 minutes or until tender and lightly browned, stirring frequently. Add green onions, 1/4 teaspoon salt, 1/4 teaspoon coarsely ground black pepper, and red pepper flakes (to your taste), and cook 1 minute. Gradually add chopped leaves, and cook, stirring, until wilted and water evaporates, about 5 minutes.

4. In large bowl, with wire whisk or fork, mix eggs, ricotta, milk, Parmesan, and cornstarch until blended. Stir in Swiss chard mixture.

5. Transfer mixture to pie plate (or muffin tins). Bake pie 40 minutes or until knife inserted 2 inches from center comes out clean. Bake about 13 minutes if using muffin tins.

6. Enjoy!

Refrigerator pickles

I had a whole lot of beautiful fresh dill from CSA week 1 that wanted to do something fun and tasty with and tada…I made pickles! It is too bad that we didn’t get dill and cucumbers in the same week. I also got to dust off (literally) my mandoline slicer. I used the “2” setting for the thickness and was happy with it.

Pickle prep


A mason jar is ideal for this, but I didn’t have one on hand so made do with a Pyrex glass dish with a lid. 

I ate some of them straight out of the container and also added them to salads. And now that most of the pickles are gone, I sliced up the kohlrabi (also from week 1) and threw them in the brine to see how pickled kohlrabi tastes!

Ready to eat

I like my pickles super sour, so feel free to add a bit of sugar if you prefer a touch of sweetness.

Refrigerator pickles
Adapted from Smitten Kitchen

Ingredients
4 kirby cucumbers, very thinly sliced
Fresh dill
3 cloves garlic, cut into quarters
1 Tablespoon mustard seeds
1 Tablespoon salt
1/2 cup white vinegar

Directions
1. Layer all the ingredients into a mason jar or glass dish with a lid and place in refrigerator. The cucumbers don’t need to be fully covered as they will exude enough water to cover themselves. 

2. Give them a shake in the fridge every couple of hours. They can be enjoyed in as little as 1-2 hours and can stay in the fridge, submerged in their brine, for up to 3 weeks

Mustard-glazed salmon with lentils

Happy Friday the 13th! I have to admit, I was a bit disappointed with this recipe. Or perhaps it was the cook and not the recipe! I overcooked the salmon and the mustard on top completely burned in the broiler. Perhaps my pan was too close to the broiler. But at least there was no broiler fire this time…yes that happened once with a steak and no broiler pan.

I did learn something new with this recipe, that canned lentils are a thing! They were tucked in with the rest of the canned beans. I’m glad they were easy to find since you all know I don’t like to “ask for directions” in the grocery store. The lentils were super yummy and could be a healthy and high fiber side dish to accompany almost anything.

Mustard-glazed salmon with lentils

Salmon, pre-broiler

Serves: 2-4
Source: adapted from Everyday Food, November 2012

Ingredients
2 Tablespoons olive oil
1 clove garlic, minced
1 medium yellow onion, diced
1/2 red bell pepper, diced
8 ounces mushrooms, sliced
1 teaspoon ground cumin
2 cans lentils, rinsed and drained
2 Tablespoons grainy mustard
4 skinless salmon fillets (4-6 ounces each)
Salt and pepper to taste

Directions
1. Heat broiler, with rack set 8 inches from heat. In a large broiler-proof skillet, heat oil over medium-high. Add garlic, onion, and pepper and cook, stirring, until the veggies start to soften. Add mushrooms and cumin, and continue to cook until soft. Remove from heat.

2. Season salmon with salt and pepper and spread mustard on the fillets.

3. Add lentils to skillet, stir, and season with salt and pepper. Nestle salmon in lentils and broil until opaque throughout, 5-8 minutes. Enjoy!

Sweet potato chickpea buddha bowl

Recipe

Recipe Notes

I typically do not buy kale, since I get so much of it during CSA season, but I wanted to give this recipe a try. I think it will be super handy in the upcoming months of veggie maintenance.

The ingredient list may look a little overwhelming, but it’s pretty quick and simple…I promise. You can easily make the Tahini sauce and mix up the spice blend for the chickpeas ahead of time. I also used nonstick foil for roasting the veggies, for easier clean up.

Source: adapted from Minimalist Baker

Photos

Kale and spice prep
Roasting veggies
Chickpea prep
Nourishing veggie bowl