Chocolate peppermint cookies

Earlier this month, I helped a friend decorate her Christmas tree. She baked up some Nestle dark chocolate peppermint cookies to make her home smell like…freshly baked cookies. Not only did they smell great, they tasted great too! And since then I have been thinking about those cookies more than I probably should, so I decided I had to try to recreate them. 

I used Ghiradelli peppermint bark (a 3.5-ounce bar was plenty; 4-5 of the individual squares would be enough too). I wanted to add a little peppermint extract but I couldn’t find it, and I gave up after looking in Whole Foods, Shaws, and Target. I give myself an A-minus…they are pretty tasty but I wanted them to be a little more peppermint-y. 

Peppermint two ways

Chocolate peppermint cookies
Makes: about 3 dozen

Ingredients
1/2 cup (1 stick) unsalted butter, softened
1/2 cup lightly packed brown sugar
1/4 cup granulated sugar
1 egg
1/2 teaspoon vanilla
3/4 cup all-purpose flour
1/2 cup unsweetened cocoa powder
1/2 teaspoon baking soda
1/2 teaspoon salt
1/2 cup chopped peppermint bark (I used Ghiradelli)
1/4 cup chopped peppermint candy canes, plus more for topping

Directions
1. Preheat the oven to 325 degrees F.

Cookies!


2. In a large bowl, cream together the butter, brown sugar, and white sugar until smooth. Beat in egg, then stir in vanilla.

3. In a medium bowl, combine flour, cocoa powder, baking soda, and salt. Stir into the butter and sugar mixture until just blended. Mix in the chopped peppermint bark and candy canes.

4. Drop by rounded spoonfuls onto ungreased cookie sheets (I line mine with parchment paper). Top each cookie with a few pieces of crushed candy canes.


5. Bake for 9-11 minutes. Allow cookies to cool on baking sheet before transferring to a wire rack to cool completely.

Hasselback apples

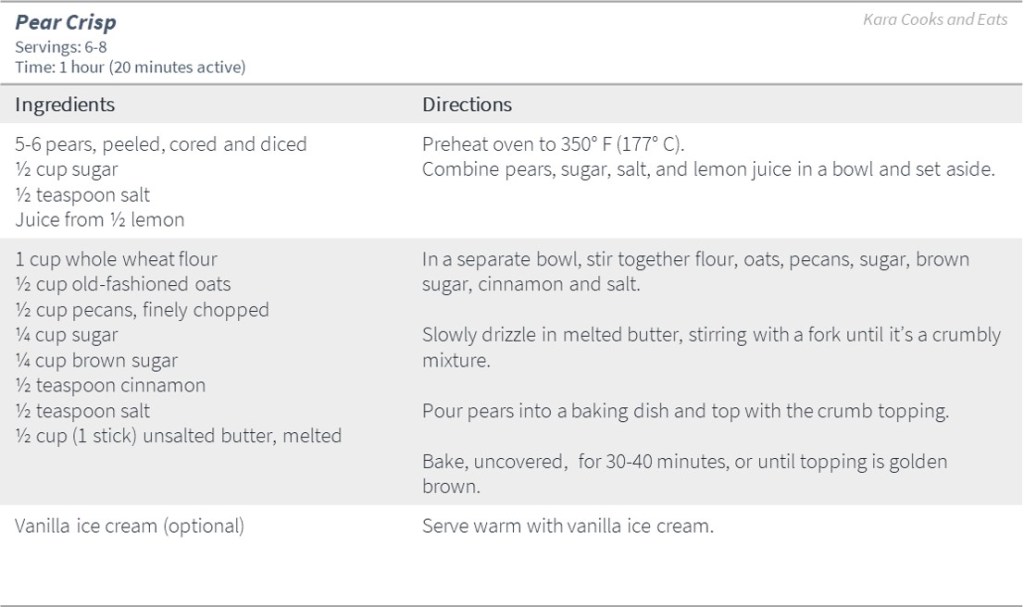
This recipe is hot off the press, aka hot out of the oven post Sunday dinner chez Kara. My friend Ruthie suggested this dessert, and it was perfect since I recently read about the Hasselback technique and I have *plenty* of apples…it was just meant to be (in my belly).

You might be wondering what the heck Hasselback means. From what I can ascertain from my friend Google, this is traditionally a potato dish that originated from Restaurant Hasselbacken in Stockholm, Sweden. The potatoes are sliced thinly, but not all the way through, so they look like an accordian. They are then brushed with butter and roasted. 

This was definitely a dessert success, and now that I’ve read more about it, I think I would like to try this with potatoes too (also something I have *plenty* of).
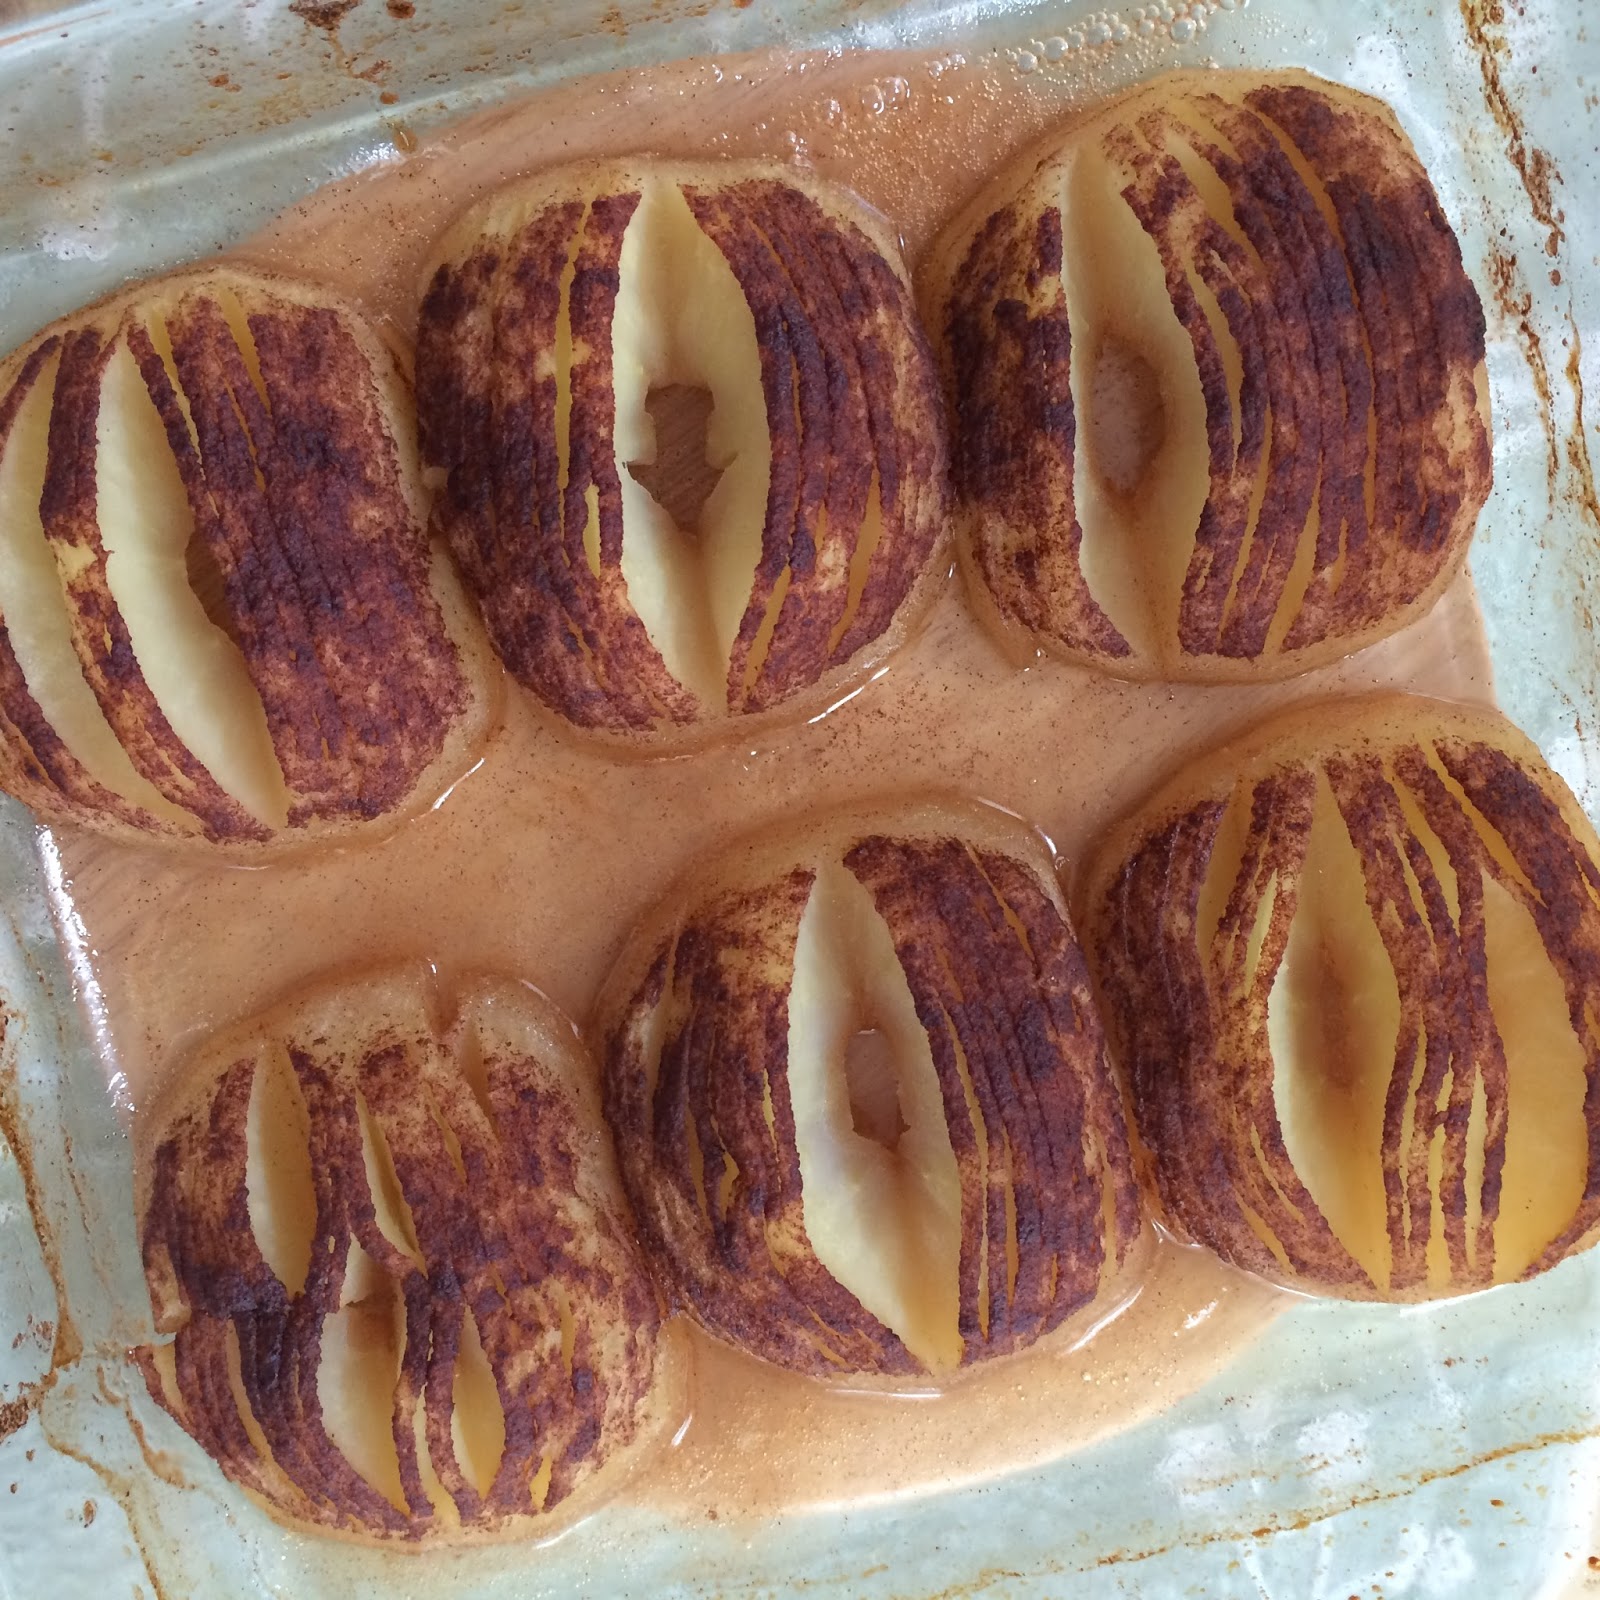
Hasselback apples

Hasselback apples after step 3

Serves: 3-6 (depends how hungry you are!)
Source: adapted from Cooking Light

Ingredients
3 medium-sized, firm apples
Cooking spray
3 Tablespoons brown sugar, divided
2 1/2 Tablespoons butter, melted and divided
3/4 teaspoon ground cinnamon, divided
2 Tablespoons old-fashioned rolled oats
1 teaspoon all-purpose flour
1/4 teaspoon kosher salt
Vanilla ice cream

Directions
1. Preheat oven to 400 degrees F.
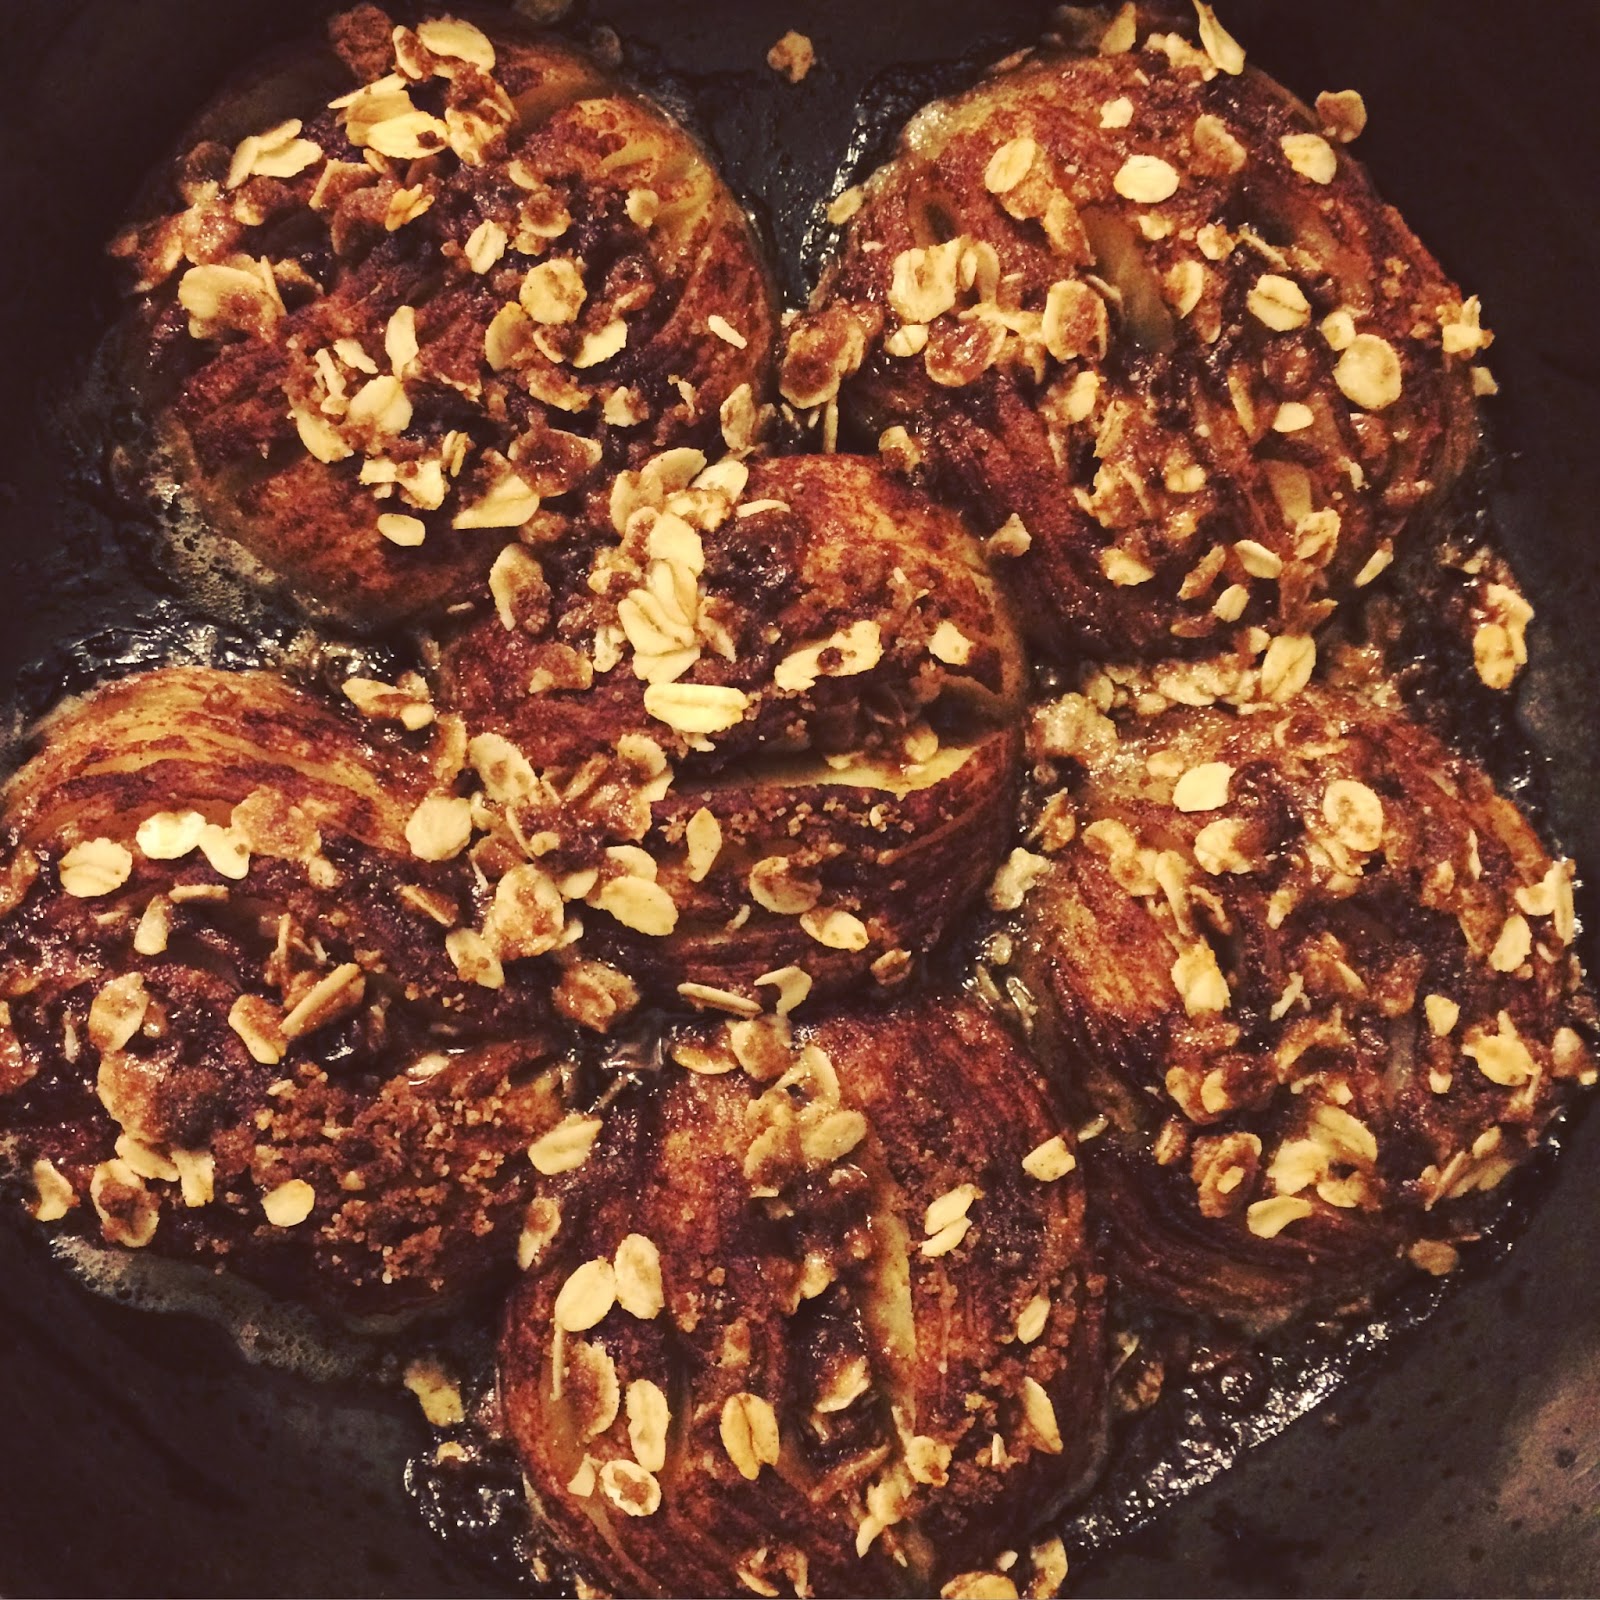
Just add ice cream!

2. Peel and core apples, then slice in half vertically. Place each apple half flat side down and slice crosswise most (but not all) the way through each half at 1/8-inch intervals. Place apple halves, flat side down, in an 8-inch broiler-safe baking dish coated with cooking spray. In a small bowl, mix together 1 Tablespoon brown sugar, 1 Tablespoon melted butter, and 1/2 teaspoon cinnamon. Brush mixture evenly over apples.

3. Cover pan with foil; bake at 400 degrees F for 10 minutes. Remove foil, then bake for an additional 10 minutes or until apples are tender. Remove pan from oven and cool for 10 minutes.

4. In another small bowl, mix together 2 Tablespoons brown sugar, 1 1/2 Tablespoons melted butter, 1/4 teaspoon cinnamon, oats, flour, and salt. Carefully fan open apple halves and spoon oat mixture evenly over the apples. Bake for 10 minutes, then turn oven to broil and broil for 2 minutes. Serve with vanilla ice cream.

Lemon sheet cake with berries

It’s Memorial Day and I had a craving for a patriotic dessert, aka a cake with strawberries and blueberries. I found a recipe for a sheet cake and made a few modifications, primarily halving the recipe and adding lemon. I also skipped the frosting. The recipe below is the original proportions, but with the lemon (and its zest).

Lemon sheet cake

Memorial Day cake!

Makes: 1 cake
Source: adapted from Eat Cake for Dinner

Ingredients
1 cup (2 sticks) unsalted butter
3/4 cup water
2 cups sugar
2 1/4 cups all-purpose flour
1/2 teaspoon salt
1 teaspoon baking soda
2 eggs
1 teaspoon vanilla
Juice from 1 lemon (1/4 cup)
1 teaspoon lemon zest
1/2 cup nonfat Greek yogurt
Strawberries and blueberries

Directions
1. Preheat oven to 375 degrees F. Grease a 12″ x 18″ jelly roll pan.

2. Melt butter in a microwave-safe bowl and add water. Stir in sugar, flour, salt, and baking soda and mix until smooth.

3. Add eggs, vanilla, lemon juice and zest, and yogurt. Mix until blended. Pour the batter into the jelly roll pan. Bake for 20 minutes or until the cake springs back when lightly touched or a toothpick inserted in center comes out clean.

4. Allow to cool. Slice and top with strawberries and blueberries.

Lemon berry ricotta cake

Getting ingredients ready

I have been trying to catch up on some magazine-reading, including the March issue of Bon Appetit. While there are several recipes I’d like to eventually try, I could not stop thinking about this raspberry-ricotta cake. And since I’m just a little obsessed with lemon ricotta anything, I decided to add lemon, both juice and zest. I had some frozen mixed berries in my freezer, so I used a mix of raspberries and blueberries (the original recipe called for raspberries or blackberries).

The recipe says the cake can be made 2 days ahead and stored at room temperature, tightly wrapped. That is, if you can make it last that long!

Lemon berry ricotta cake
Serves: 8

Mixin’ batter

Source: Bon Appetit, March 2015

Ingredients
Nonstick vegetable oil spray
1 1/2 cups all-purpose flour
1 cup sugar
2 teaspoons baking powder
3/4 teaspoon kosher salt
3 large eggs
1 1/2 cups ricotta
1/2 teaspoon vanilla extract
1 Tablespoon lemon zest (from 1 lemon)
1 Tablespoon lemon juice (from 1/2 lemon)
1/2 cup (1 stick) unsalted butter, melted

Outta the oven and ready to eat!

1 cup frozen berries, divided

Directions
1. Preheat oven to 350 degrees F. Line a 9″-diameter cake pan with parchment paper and lightly coat with nonstick spray. 

2. In a large bowl, whisk together dry ingredients (flour, sugar, baking powder, and salt) in a large bowl.

3. In a medium bowl, whisk together eggs, ricotta, vanilla, lemon zest, and lemon juice until smooth; fold into dry ingredients just until blended, then fold in butter. Gently mix in 3/4 cup berries.

4. Scrape batter into prepared pan and top with remaining 1/4 cup berries. Bake cake until golden brown and a tester inserted into the center comes out clean, 50-60 minutes. Let cool at least 20 minutes before unmolding.

Neptune brownies

View from my front door

This weekend brought another 16-plus inches of snow to the Boston area and So. Much. Shoveling. I thought brownies would be a slightly different twist on my tradition of baking during storms that start with “N” in February…see my recipes for Nika cookies (oatmeal chocolate chip pecan) and Nemo cookies (chocolate chip pecan). I mean, how can you resist a recipe that calls itself “the best brownies in the world.” After these, I’m not sure I will ever be able to go back to brownie mixes!

Neptune brownies

Ingredient prep

Serves: about 16
Source: Tasty Eats at Home and Cravings of a Lunatic via Pinterest

Ingredients
1 stick (1/2 cup) butter
2 ounces unsweetened chocolate
1 cup sugar
2 eggs, beaten
1/2 teaspoon vanilla
1/2 cup semi-sweet mini chocolate chips
1/4 cup all-purpose flour
1/4 teaspoon salt

Directions
1. Preheat oven to 325 degrees.

2. Line an 8 x 8 baking pan with parchment paper. 

Delish!


3. In a medium saucepan melt the butter and unsweetened chocolate over low heat, stirring constantly.

4. Remove from heat and add the sugar. Stir well. Add eggs and vanilla, and stir until smooth.

5. Add chocolate chips, flour, and salt. Stir until well blended.

6. Pour into pan and place in oven. Bake for 35-45 minutes until done (when a toothpick inserted in the center comes out clean).

7. Remove pan from oven and cool on a wire rack before cutting.


Delectabites

The infamous nut chopper

I do not know the story behind the name for these cookies or where the recipe even came from…I just know that, when made correctly, they are delectable. 

I haven’t made these cookies in years (they used to be part of the regular Christmas cookie repertoire), and I accidentally doubled the amount of butter…using two sticks instead of just one. Even though they didn’t turn out as planned (flat, crumbly cookies instead of balls), they were still pretty tasty. I mean, how can you go wrong with two sticks of butter?

Delectabites
Makes 50 cookies

Butter (times 2) cookies

Ingredients
1/2 cup (1 stick) butter, softened
2 Tablespoons granulated sugar
1 teaspoon vanilla
1 cup sifted all-purpose flour
1 cup finely chopped walnuts
Powdered sugar

Directions
1. Preheat oven to 350 degrees F.

2. In a medium bowl, thoroughly mix butter, sugar, and vanilla. Gradually stir in flour and walnuts. Chill.

3. Shape into marble-sized balls. Bake on ungreased cookie sheet for 15-17 minutes, until firm but not brown. Roll gently in powdered sugar. Cool; sugar again.

Banana cream pie

Amy (and Saoirse) were kind enough to host our pie day, and she was also smart enough to pick a pie recipe that didn’t require competing for oven time! I am not usually a huge fan of bananas, but I loved this pie. I even had it for breakfast the next morning. 

The recipe came with two “Baker’s Notes”:

  • To crush vanilla wafers, place a handful of cookies in a heavy-duty plastic bag, then roll over the bag with a rolling pin to crush them. When crushed, empty the bag into a measuring cup and repeat until you have the desired amount of crumbs.
  • To get the pie slices to release easily from the pie pan, heat up a wet dish cloth in the microwave and heat until hot. Fold the cloth into a 9-inch square and place it on the counter. Place the pie on the hot cloth. In a few  minutes, the heat will soften the butter in the crumb crust enough that slices will slide from the pan.

‘Nilla wafer crust

Banana cream pie
Serves: 8
Source: The Prepared Pantry

Ingredients
For the crust:
2 cups crushed vanilla wafers
1 Tablespoon granulated sugar
6 Tablespoons butter, melted

Banana cream pie

For the filling:
2/3 cup sugar
1/4 cup flour
1 Tablespoon cornstarch
1/4 teaspoon salt
2 cups milk or light cream
4 large egg yolks
1 teaspoon vanilla
2 Tablespoons butter
3 small to medium-sized bananas, sliced

Directions
1. For the crust: crush the vanilla wafers. Place the crushed wafers in a large bowl, add the sugar, and stir to combine. Add the melted butter and combine well. Evenly press the mixture into a buttered 9″ deep-dish pie pan. Place the crust in the freezer to get hard while you make the filling.

2. For the filling: place the sugar, flour, cornstarch, and salt in a saucepan. Add the milk or light cream and whisk together, then whisk in the egg yolks.

3. Heat over low heat, stirring regularly, until the mixture is thick and just begins to bubble. Add the butter and vanilla and stir to combine. Let the mixture cool for 15 minutes.

4. Remove the pie crust from the freezer and spread the banana slices evenly across the bottom of the pie shell. Pour the filling over the banana slices. Chill for several hours.

Fruits of the forest berry pie

Mixed berries

The fourth pie we made for #pieday was a berry pie, and Ruthie even got fancy with a lattice top (I think she wanted to win the “contest”). She was on Team Crisco and used all Crisco, even though the crust recipe she used called for part Crisco (1/4 cup) and part butter (2 Tablespoons). 

She was also a little “loosey goosey” with the filling part of the recipe, so the recipe below is our best guess at what actually happened. We baked this pie and the apple together, so this baked at 400 degrees (instead of 425) initially. 

Ready for the oven


Fruits of the forest berry pie
Serves: 8
Source: Lee Bailey’s Country Desserts (also via Epicurious)

Ingredients
For the sweet crust:
1 1/2 cups sifted all-purpose flour
3/4 teaspoon salt
2 Tablespoons sugar
5 Tablespoons ice water
1/4 cup plus 2 Tablespoons Crisco, chilled and cut into bits
1 egg, beaten

Bakin’ pies


For the filling:
Approximately 1 1/2 quarts mixed berries (strawberries, blueberries, blackberries)
1 cup sugar, more to taste
3 Tablespoons cornstarch
Squeeze of lemon juice

Directions
1. Preheat the oven to 425 degrees F.

2. For the crust: sift together the flour, salt, and sugar. Remove 1/3 cup of this and mix with the ice water to make a paste. Set aside.

3. Place the remaining flour mixture in a food processor and add shortening. Process until coarse. Scrape in the paste and process until this mixture forms a ball. Place ball between 2 sheets of waxed paper and flatten slightly. Refrigerate for about 30 minutes.

4. Roll out the dough on a lightly floured surface into a 14-inch circle. Line a 9-inch pie pan with the dough, allowing excess to hang over the sides. Trim, leaving about 1/2-inch all around. Fold edges under and crimp. Cut a few slits in the crust and bake 5-7 minutes or until golden.

5. For the filling: mix together ingredients and pour into pie shell. 

6. Lay second pie crust over berries; press along rim to seal. Using kitchen shears, trim overhang to 1 inch. With floured fingers, fold overhang under itself to form a thick rim and crimp edges. Or see how to make a lattice crust here

7. Brush top of crust with egg wash; place pie on a rimmed baking sheet. Bake 20 minutes; reduce heat to 375 degrees F and bake until crust is golden and juices are bubbling, 20-25 minutes more.

Pecan pie

Our third delicious pie was pecan, courtesy of Sara and “The Joy of Cooking”. She was on Team Crisco for the crust…though I think it is interesting that it is not all shortening, but a mix of shortening and butter. 

Pecan pie would definitely be a good way to use up some of the pecans I receive from my company every year over the holidays! I recently cleared out six years of November issues of Everyday Food, and I came across (and pinned) several variations of pecan pie that also sounded delicious…involving chocolate and booze.

Pecan pie

Team Crisco!

Serves: 8
Source: The Joy of Cooking

Ingredients
For the crust:
2 cups all-purpose flour
1 teaspoon salt
2/3 cup shortening
2 Tablespoons chilled butter
4-5 Tablespoons

For the filling:
3 eggs
1 cup sugar
1/2 teaspoon salt

Ready for the oven

1/3 cup butter, melted
1 cup light corn syrup
1 cup pecan halves
1 teaspoon vanilla or 1 Tablespoon rum

Directions
1. Preheat oven to 450 degrees F.

Gorgeous (and delish)!


2. For the crust: sift together flour and salt. Measure and combine the shortening and chilled butter. Cut half of the shortening into the flour mixture with a pastry blender or work it in lightly with your fingers until it has the grain of cornmeal. Cut the remaining half of the shortening into the dough until it is pea-sized. 

3. Sprinkle the dough with 4 Tablespoons water. Blend the water lightly into the dough. If needed add 1 teaspoon to 1 Tablespoon more water. When you can gather the dough into a neat ball, stop handling it!

4. Bake pie crust for 5-7 minutes and allow to cool. Decrease heat to 375 degrees F.

5. For the filling: In a large bowl, combine eggs, sugar, salt, butter, and corn syrup, and beat thoroughly. Stir in 1 cup of pecan halves and vanilla (or rum).

6. Add mixture to the pie shell and bake for 40-50 minutes.