Tomatillo salsa

Getting ready to broil

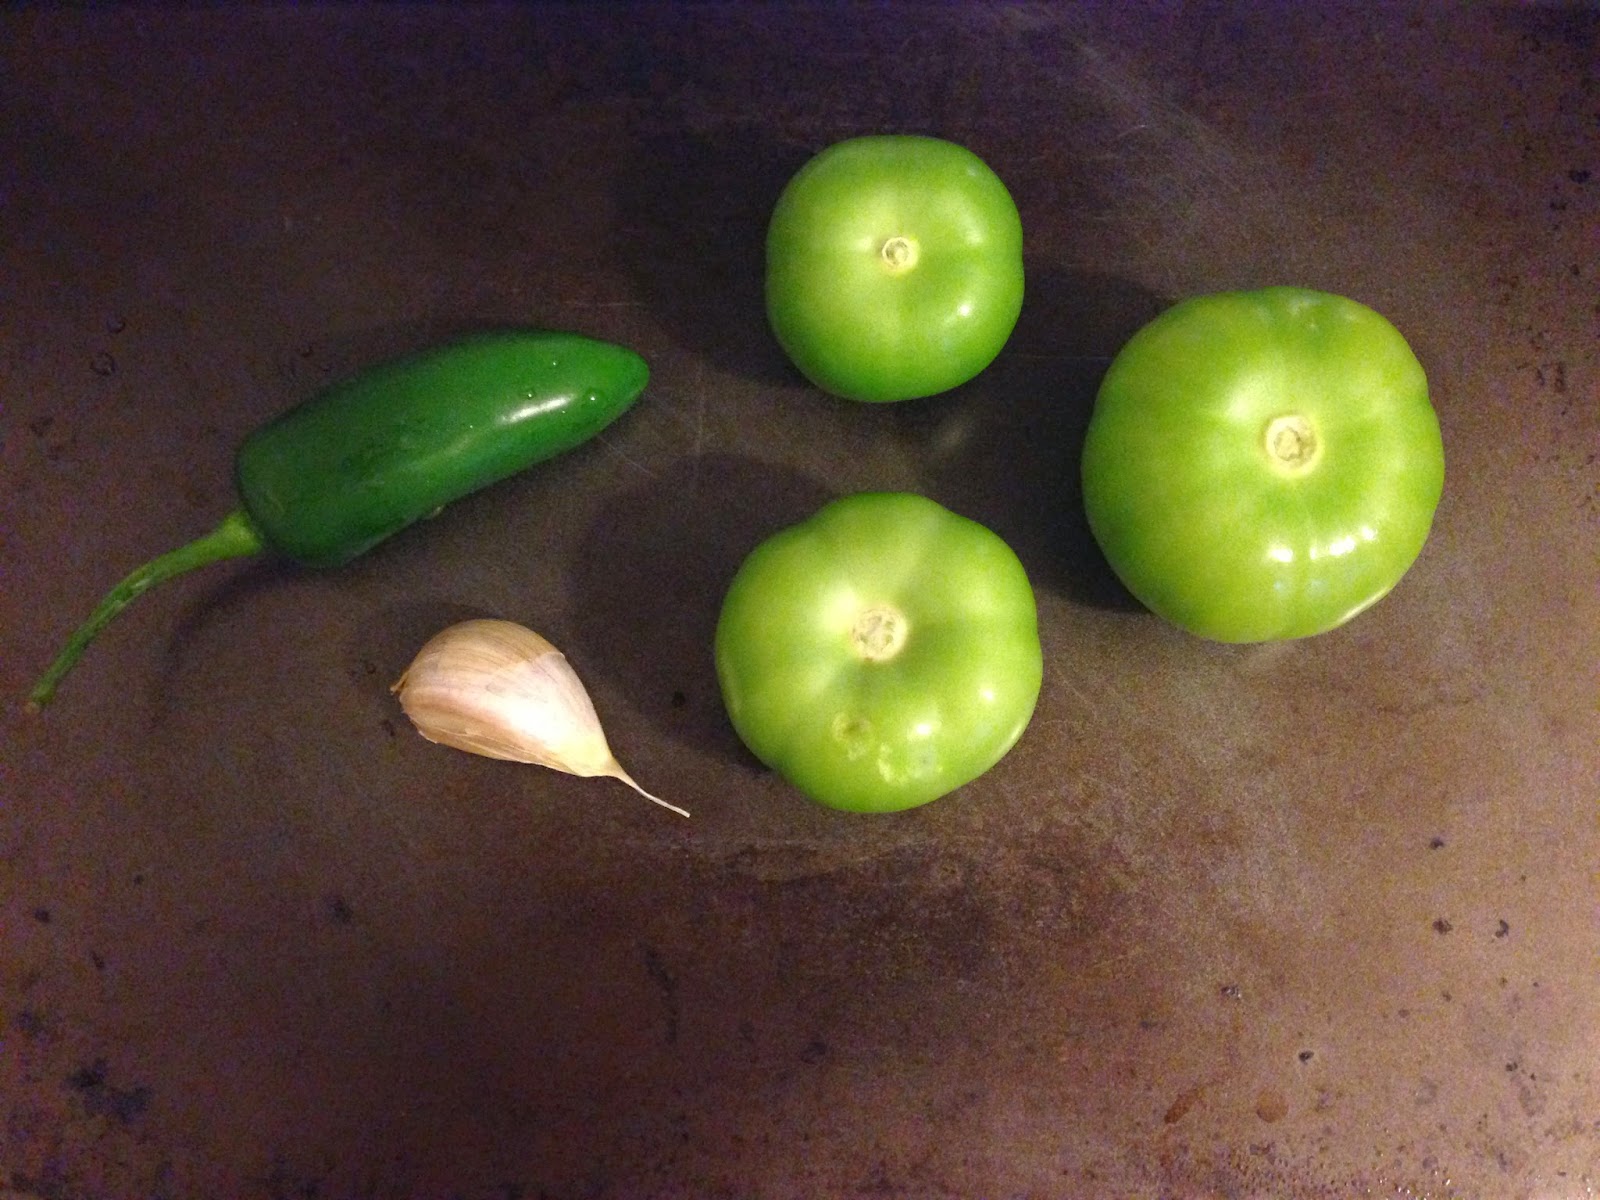
It is always nice when your ingredients (or in this case CSA share) guide you in the direction of what to make. I had all of the ingredients for this tasty (and spicy!) salsa on hand…everything except tortilla chips!

I adapted the recipe to accommodate the three tomatillos we got this week (the original recipe called for 1 1/2 pounds). Mine was a bit spicy because I used a whole jalapeno…so feel free to adjust based on the amount of heat you can take.

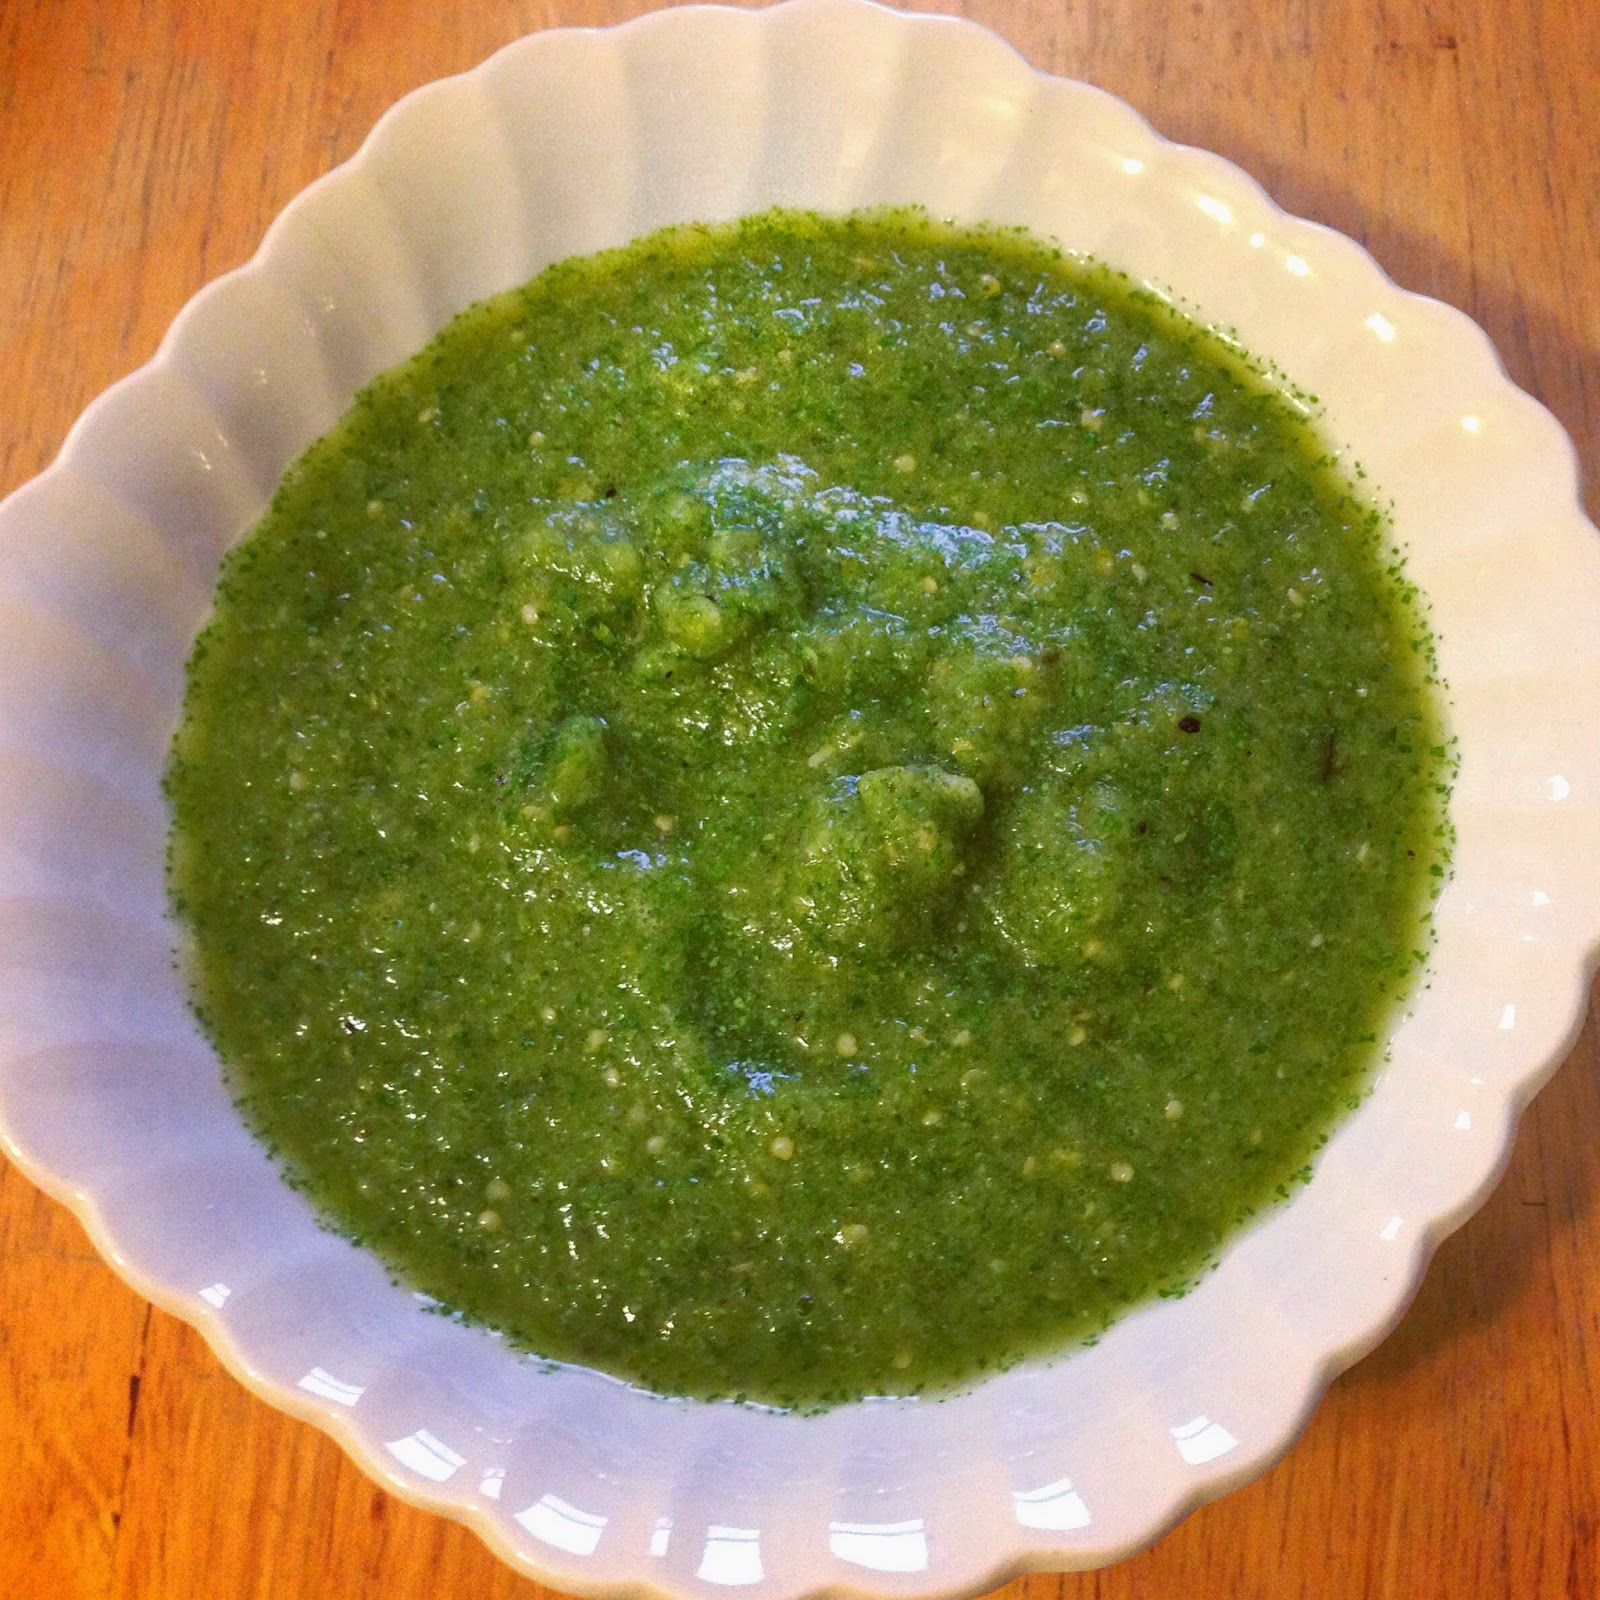
Roasted tomatillo salsa
Makes: about 1 1/2 cups

Just add chips

Source: adapted from Epicurious

Ingredients
3 fresh tomatillos, husks removed and rinsed to remove stickiness
1/2 jalapeno pepper, ribs and seeds removed
1 garlic clove, unpeeled
1/4 cup fresh cilantro
1/2 medium onion, coarsely chopped

Directions
1. Preheat broiler. Broil jalapeno, garlic, and fresh tomatillos on rack of a broiler pan 1 to 2 inches from heat, turning once, until tomatillos are softened and slightly charred, about 7 minutes.

2. Peel garlic and place all ingredients in a blender or food processor. Puree until smooth and enjoy!

Skillet tomato casserole

I know it may be hard to believe, but I’ve been having a hard time keeping up with all of the tomatoes this summer. Sadly, a couple of them have had to go straight to compost. My friend (and CSA buddy) Claire shared this recipe with me as a good way to use a bunch of tomatoes.

The recipe turned out to be a bit dangerous for me…after I had taken the skillet out of the oven, I had a blonde moment and accidentally grabbed the handle of the pan. #Ouchie. Dinner with a side of first-degree burns. After that I kind of lost my appetite and decided to drink the pain away instead. Now that my hand is recovered, I have been taking the leftovers for lunch this week and have made peace with this dish. As Claire told me, it’s not the recipe’s fault that I burned myself! 

Mise en place

I was worried that the bread would get too soggy when it was reheated in the microwave. It did get soggy, but not annoyingly so. I also discovered the addition of the shredded mozzarella cheese with my lunch today – because how can you go wrong with more cheese?

Bread, tomatoes, and greens

I used cannellini beans instead of Great northern beans and substituted kale and beet greens for the frozen spinach (added at step 3 with the tomatoes). I also decreased the salt from 2 teaspoons to 1/2 teaspoon. That would have been a whole lotta salt! I didn’t have any fresh basil so I omitted that as well.

Skillet tomato casserole
Serves: 4-6
Source: The Law Student’s Wife via Claire

Ingredients
2 Tablespoons extra virgin olive oil, divided
3 cups bread, diced into 1/2-inch cubes
2 1/2 pounds fresh tomatoes, cut into 1/2-inch dice
3 garlic cloves, minced
1 teaspoon sugar

Bread tomatoes, greens, and beans

1/2 teaspoon kosher salt
Fresh ground pepper to taste
1 can cannellini beans, rinsed and drained
10-ounce package frozen spinach, thawed with excess moisture pressed out
1/2 cup fresh basil leaves, julienned
1/2 cup freshly grated Parmesan cheese
1/2 cup shredded mozzarella cheese

Directions
1. Place rack in the upper third of oven and preheat the oven to 350 degrees F.

Lunch is served!

2. Heat 1 1/2 Tablespoons of olive oil in a large and deep ovenproof skillet over medium heat. Add the bread cubes and stir to coat with the oil. Cook over medium to medium-high heat for 5 minutes, stirring frequently, until the cubes are evenly browned.

3. Add the tomatoes, garlic, sugar, salt, and pepper to the skillet. Cook until the tomatoes break down, stirring frequently, about 5 minutes.

4. Remove pan from heat and stir in the beans, spinach, and basil until well mixed. Sprinkle with Parmesan cheese and drizzle with the remaining 1/2 Tablespoon of olive oil.

5. Bake uncovered for 30-40 minutes, until the top is browned and the tomatoes are bubbly. Remove from oven (carefully!) and sprinkle with mozzarella cheese and enjoy!

Company eggs (eggs and Swiss chard)

Fresh out of the oven

I came across this recipe on Twitter and thought it would be a great use for my two weeks of Swiss chard. I halved the recipe since two weeks of chard = 1 bunch. It is a good thing I wasn’t actually having company because there were only enough greens for one egg! I like a runny yolk and 15 minutes in the oven was too long…it cooked the yolk all the way through. It was still very tasty, but how can you go wrong with cream and cheese?

Company eggs for one

The cream and the greens kind of reminded me of creamed spinach, which made me want to add a bit of nutmeg to the recipe (just 1/4 teaspoon). I substituted light cream for the heavy cream. The complete recipe is below, but I am skeptical that 2 bunches of Swiss chard would be enough for 12 eggs. If you give it a try, let me know how it comes out! 

Company eggs
Serves: 6
Source: Epicurious

Ingredients
2 Tablespoons olive oil
1 small onion, thinly sliced
4 cloves garlic, minced
Kosher salt, freshly ground pepper
2 bunches Swiss chard, coarsely chopped (ribs and stems removed)
1/2 cup heavy cream
1/4 teaspoon nutmeg
12 large eggs
1/2 cup shredded white cheddar cheese

Directions
1. Preheat oven to 400 degrees F. Heat oil in a large skillet over medium heat. Add onion and garlic; season with salt and pepper. Cook 8-10 minutes, stirring occasionally, until onion is softened.

2. Add chard to skillet and cook 8-10 minutes until tender, tossing frequently. Add cream and nutmeg and simmer until thickened and almost evaporated, 8-10 minutes; season with salt and pepper.

3. Spread chard mixture evenly in a 13″x9″x2″ baking dish. Using the back of a spoon, make 12 small, evenly spaced divots in the chard mixture. Crack 1 egg into each divot. Season eggs with salt and pepper. Sprinkle with cheese.

4. Bake, rotating dish once, until egg whites are almost set and yolks are still runny, 15-18 minutes. Let stand 5 minutes before serving.

Quick (and not so quick) dillie beans

Washed green beans

I’ve had a recipe for dillie beans for years, passed on to me from my friend Heather. But even though I’ve had good intentions, I’ve never gotten around to making it because I’m a little intimidated by the canning process. I’m more of a fun of a quick pickle than pickling things to store them. Since quick pickles have to be eaten relatively quickly, I tend to make them in smaller batches. I figured I’d share both recipes as one day I hope to figure out a way to adapt the dillie bean recipe into a smaller portion and a quick pickle.

Add your spices first!

I don’t know exactly how many beans this was (since at pick-up the instructions were 1 bowlful), but I was able to fit them all in my Great South Bay Brewery mason jar!

Quick pickled green beans
Source: adapted from It Doesn’t Taste Like Chicken

Ingredients
1 1/2 teaspoons mustard seed
10 black peppercorns
Pinch of red pepper flakes
1/4 cup fresh dill
1 clove garlic, peeled
Green beans (enough to pack a mason jar)

Pickled beans!

1 cup water
1 cup white vinegar
2 Tablespoons salt

Directions
1. Wash and trim beans. To bottom of jar, add mustard seed, black peppercorns, red pepper flakes, garlic, and dill. Pack the green beans into the jar tightly so that they are standing up.

2. Combine water, vinegar, and salt in a pot and bring to a boil. Pour over beans leaving 1/4-inch head space and close jar. Let sit at least one day and enjoy!
______________________________

Dillie Beans
Source: Erin MacLeod…it was her grandmother’s recipe

Ingredients
2 pounds green beans (young and tender)
1 teaspoon powdered alum
1 gallon water
1/2 teaspoon minced garlic
4 teaspoons dill seed
2 teaspoons mustard seed
1 teaspoon crushed red pepper
2 cups water
2 cups cider vinegar
1/4 cup salt

Directions
1. Wash beans and trim ends, and place in stone crock or glass container. Dissolve alum in the 1 gallon of water, pour over beans, and let stand 24 hours.

2. Drain and wash beans. Pack lengthwise into 4 hot pint-size canning jars. To each jar, add 1/8 teaspoon minced garlic, 1 teaspoon dill seed, 1/2 teaspoon mustard seed, and 1/4 teaspoon crushed red pepper.

3. Combine 2 cups water, cider vinegar, and salt in a pot and bring to a boil. Pour over beans leaving 1/4-inch head space. Close jars.

4. Process 25 minutes in boiling water bath.

My meal at Menton

with Barbara Lynch and Kendrin

I started this post almost a year ago, and I finally decided to finish it. Some meals are just that memorable. Or more importantly, sometimes the company you keep deserves to be extolled, especially if said company is moving back to her home state in a few days. While she deserves more than just a silly little blog post, this one goes out to my fabulous friend Kendrin who had a temporary opening for a plus one for this event last August, which was a four course dinner with wine pairings for select American Express card members. She apparently has mad AmEx skills. 

For many of us here in Boston, we’ve been in denial that she is actually moving away. But sadly for us, it’s true. Kendrin and I moved to Boston as wide-eyed twenty-somethings more than a decade ago and we met as part of the “elite eight” who were matched to Tufts for a dietetic internship. It is hard to describe all that we’ve experienced together…from the traumatic (9/11/2001 and the Boston Marathon bombings last year) to sharing birthday celebrations, starting our Restaurant Club, taking up running, and traveling the world. Not to mention some pretty fantastic professional accomplishments along the way (hello ScD from Harvard!). Through love and loss and everything in between, those bonds have some serious strength.

Corn veloute

I’d also like to give a shout out to our lovely table companions, and of course the one and only Barbara Lynch. Even with a full restaurant she was gracious enough to speak to the group, take photos, and personalize the copy of her cookbook (Stir) that we all received. The Barbara Lynch Gruppo also includes No. 9 Park, B&G Oysters, The Butcher Shop, Stir, Drink, Sportello, and 9 at Home (catering). A not-so-small empire.


Beef

The wine and bubbles were flowing from the time we were greeted at the door. They were also serving a “paper plane” cocktail which involved bourbon. I will pretty much always choose bubbles over almost anything else. Then there were many many rounds of passed hors d’oeuvres, even though most people took their seats during the cocktail hour. There were teeny tiny onion baguettes with goat cheese, teeny tiny zucchini rolls with ricotta (which I actually really liked), oysters with caviar, lobster BLT with avocado, and a fish one that I can’t remember the specifics on. The lobster BLT was my least favorite, even though I love the full-size version at B&G.


Creme brulee
Devil’s food cake

Then began a four-course dinner with wine pairings. Since Kendrin and I are good sharers, we got to try everything. The food was beautiful…almost too pretty to eat. Our first course was a roasted carrot salad with yogurt, date, vadouvan (an Indian spice blend) which was paired with a 2012 Leitz Riesling “Dragonstone” . The second course was a corn velouté with littleneck clam, brioche, and smoked bacon or an east coast halibut with coriander, orange, and carrot. I liked the corn velouté better than the halibut, barely. This was paired with a 2011 Guillot-Broux Macon-Cruzilles “La Croix”. For the main course, I preferred the beef (roasted prime strip loin of beef with bone marrow-crusted onion, frisée, and chanterelle) over the chicken (Giannone Farms chicken with hen of the woods, brioche, and Swiss chard). The chicken was paired with a 2010 Rion Bourgogne Rouge and the beef was paired with a 2009 Chateau Landat Haut Médoc Bordeaux. 

Dessert was a toss-up…I was also so full that I couldn’t finish my half! There was a mascarpone creme brulee with peach, thyme, and cinnamon, which was paired with a 2012 Saracco Moscato d’Asti. The other dessert was devil’s food cake with coca nib, blackberry, and almond, which was paired with a 2012 Cascina Garitina Brachetto d’Acqui “Niades.” Even though I couldn’t pick a favorite, they were both so pretty I had to include their photos here!


The rundown
Menton
354 Congress Street, Boston

Sloppy joe stuffed peppers

I had three beautiful peppers that just screamed “stuffed peppers”. I also started going through old September issues of Everyday Food and came across a recipe for turkey sloppy joes. I decided these two ideas needed to be combined. A quick search online shows a plethora of sloppy joe stuffed pepper recipes, so I certainly cannot take credit for the idea. 

I used the cooking instructions from Host the Toast and adapted the sloppy joe mixture from the Everyday Food recipe. This would probably work well in the slow cooker, but I didn’t want to risk another 10-hour fiasco a la my attempt at kielbasa and cabbage.

Naked pepper halves

Sloppy joe stuffed peppers
Serves: 3
Adapted from Host the Toast and Everyday Food, September 2007

Ingredients
3 bell peppers, halved and seeded
1 Tablespoon olive oil
1 large carrot, coarsely grated (2 cups)
2 celery stalks, diced small
1 medium onion, minced
2 garlic cloves, minced
2 Tablespoons tomato paste
1/2 pound lean ground turkey
1 can (28 ounces) crushed tomatoes

Getting ready to bake the stuffed peppers

2 Tablespoons dark brown sugar
1 Tablespoon cider vinegar
1 teaspoon Worcestershire sauce
Salt and pepper to taste
Shredded cheese

Directions
1. Preheat oven to 350 degrees F. 

Cheese makes everything better

2. In a large saucepan on the stove, heat oil over medium; add carrots, celery, onion, and garlic. Season with salt and pepper. Cook 4-5 minutes until softened, stirring occasionally.

3. Stir in tomato paste and cook for 1 minute. Add turkey; cook 4-5 minutes until no longer pink, breaking up meat with a spoon. Add crushed tomatoes, brown sugar, cider vinegar, and Worcestershire sauce. Cook 12-14 minutes until slightly thickened, stirring occasionally.

4. While sloppy joe mixture is cooking, place the peppers, cut side up, in a baking pan. Bake for 10-15 minutes, or until slightly softened. Remove from oven.

5. Divide the sloppy joe mixture among the pepper halves and bake for 15 minutes. Top peppers with your favorite shredded cheese and bake for another 5 minutes or until the cheese has melted. Enjoy!


Kielbasa, cabbage, and onions

Prepped for the slow cooker

This was the second of my “cabbage two ways” experiments, and it was a semi-fail due to operator error. Apparently 10 hours in a slow cooker was way too long! The kielbasa, because it is placed on the top of the mixture, got way overcooked. 

Since I prepared everything the night before and stored the crock pot container (is that what it’s called?) in the refrigerator overnight, I thought this would be an easy weekday meal. Unfortunately a normal weekday means at least 10 hours out of the house for me. 

I did enjoy the flavor of the cabbage, especially with the whole grain mustard. I also think it might be interesting to use beer instead of broth for the liquid. I do wonder what would have happened if I had mixed the kielbasa into the cabbage mixture…maybe next time.

Kielbasa, cabbage, and onions

#burnt

Serves: 4
Source: Food.com via Pinterest

Ingredients
1/2 head green cabbage, cored and cut into wedges
1 medium onion, halved and thinly sliced
1/4 teaspoon salt
1/4 teaspoon black pepper
1 cup chicken broth (or beer!)
1 Tablespoon whole grain mustard
1 package (13 ounces) kielbasa, cut into 3-inch pieces

Directions
1. Coat the slow cooker container with cooking spray. Add the cabbage, onion, salt, pepper, broth, and mustard and stir so that the cabbage is well-coated with the broth and seasonings. Top mixture with kielbasa.

2. Cover and cook on low for 7 hours. Stir, then cook for 1 hour more and enjoy!

Cabbage and mushroom stir fry

Mise en place

It’s great that cabbage lasts so long, but it also takes up a lot of space in the vegetable drawer, so it was time to figure out how to make something tasty for my belly. I did cabbage two ways, and this recipe was a winner!

Cabbage and mushroom stir fry
Serves: 3-4
Source: adapted from Divine Healthy Food via Pinterest

Ingredients
1 Tablespoon canola oil
2 scallions, thinly sliced
Close up
2 cloves garlic, minced
1/4 teaspoon red pepper flakes
1/2 medium green cabbage, chopped
5 mushrooms, sliced
1/4 teaspoon salt
1 Tablespoon low sodium soy sauce
1 teaspoon white wine
1/2 teaspoon garlic powder
1/2 teaspoon smoked paprika

Directions
1. In a large skillet, add the canola oil, scallions, garlic, and red pepper flakes. 

2. Turn the heat on medium-high and let it warm up for a couple of minutes. Add the cabbage, mushrooms, and salt. Saute for about 5 minutes, stirring frequently.

3. Add soy sauce, white wine, garlic powder, and paprika. Saute for another 5 minutes, stirring frequently. Enjoy!

Black bean dip

Last week I had a lot of fixins’ for a taco night, but taco nights for one are no fun. So last weekend I hosted a Sunday taco night and made this great black bean dip. I extracted the dip recipe from a recipe for black bean tostadas with caramelized onion and jalapeno relish from the May issue of Shape magazine. 


The original recipe called for two cans of beans, which I thought sounded excessive, but it was supposed to be the main protein for the dish. Since I also cooked up some ground beef, and there were only three of us for dinner…it was definitely excessive. Next time I would cut the recipe in half, or it would be great for a potluck or a larger number of people.

This went very well with the corn, cilantro, cotija side I made as well as the corn and black bean salad that one of my guests brought, and the corn and black bean salsa I purchased. It was a corn and black bean kind of night.
Getting ready for taco night!

Black bean dip
Makes: a lot!
Source: adapted from Shape magazine, May 2014

Ingredients
1 Tablespoon canola oil
1 medium yellow onion, chopped
2 garlic cloves, chopped
1/4 cup cilantro leaves
2 cans (15 ounces) black beans, drained and rinsed
1/2 teaspoon ground cumin
1/2 teaspoon red pepper flakes
6 ounces plain Greek yogurt (or homemade!)
2 large tomatoes, halved, cored, seeded, and diced
Salt to taste

Directions
1. In a large skillet, heat the oil over medium-high for 1 minute. Add the onion and garlic and cook, stirring occasionally, until the onion is soft, about 2 minutes.

2. Transfer the onion mixture to a food processor or blender. Add the cilantro, black beans, cumin, and red pepper flakes, and blend until smooth.

3. Transfer the puree to a medium bowl and blend in the yogurt and tomatoes.

CSA Week 9

Week 9

There was no sign at this week’s pickup (also no Kara), but luckily everything was identifiable…and very colorful. It’s like ROYGBIV week! We’ve got red tomatoes, orange carrots, yellow corn, green Swiss chard and lettuce, blue-berries, and let’s go with cabbage and beets for indigo, and a pepper that’s violet. I will certainly be eating a rainbow this week, in addition to the lettuce, beet, and cabbage still hanging out in my fridge.


Side of corn
I made some delicious corn this week, with cotija cheese and cilantro. It was a perfect side for taco night. Cotjia cheese is a crumbled cow’s milk…I call it a Mexican feta. It came in a 12-ounce package so I will probably make it again this week! Here are the proportions I used with two ears of corn, cooked and cut off the cob:

1 teaspoon canola oil
2 teaspoons fresh lime juice
1/4 cup chopped cilantro
1-2 ounces cotija

Bento lunch and snacks
I’ve been doing such a good job with bringing my lunch and snacks, but have been using so many containers for everything (especially with taco night leftovers this week). So I was very happy to rediscover my Bento lunch pail, which was a Secret Winter Pal gift a couple of years ago from my friend Kendrin (I always seem to be her SWP).

Here’s what I’ll be packing in my lunch pail this week:
  • Lettuce
  • Swiss chard
  • Onion
  • Red cabbage
  • Beets (2)
  • Tomatoes (8)
  • Corn (3 ears)
  • Carrots (2)
  • Cucumbers (2)
  • Pepper
  • Watermelon
  • Blueberries